


Introduction
Are you fond of using the terminal? If so, I have some exciting news for you. I've developed a CLI tool that enables you to publish blogs directly from your terminal. Furthermore, I've integrated an additional feature to import Readme.md file from your github repository.
So basically my comhash tool helps you to do the following things
You can import a blog into Hashnode directly from your terminal using the following command
comhash publishYou can publish github README.md into your Hashnode
You can update README.md by importing any Hashnode blog into your github repository
How Comhash works?
So basically you have to make a directory where .env file will save your tokens.Then go to that directory and type in terminal
npm init -y
then run the following command
npm i comhash
it will install the comhash in your node_module folder. Now, If you want to upload a md file from your computer just type in terminal
npx comhash publish
Now you have to provide PAT(Personal Access Token), blog's title and publication name (like kishar.hashnode.dev). Here is an example below

here you can see that the default tag is software-engineering
The second feature but very important feature is importing from github. Here is an example
type in terminal npx comhash github
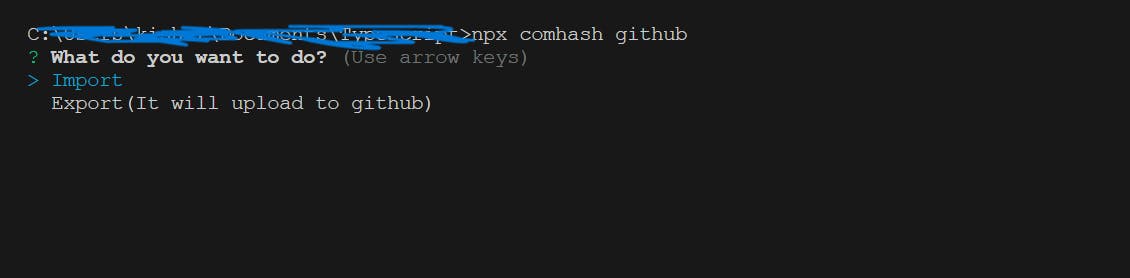
You will be given two options
- Import : this will import README.md file of any given repository of your github to Hashnode


- Export : this will update any README.md file of your github by a Hasnode blog

You can see here that I do not have to provide github token. It is already there in .env file
Should you use comhash?
If you have any md file in your computer and want to import it into Hashnode you can use comhash. You can use it to export blog into github README.md files . So, basically it depends on your need.
How did I build it?
To build this cli tool , I have used the following tools
- commander : It provides a framework for defining command-line options, arguments, and commands, making it easier to build powerful and user-friendly command-line applications. In my package I have used it in index.js file (Note: I am providing a fraction of the code; the actual program is way more complex than what is shown here.)
//index.js
#!/usr/bin/env node
const { Command } = require('commander');
//all query and mution imports

const program = new Command();


program.configureHelp({
  sortSubcommands: true,
  subcommandTerm: (cmd) => cmd.name()
});

//Publish a blog
program
  .command('publish')
  .description('publish a blog')
  .action(publishBlog)
Here if I run node index.js publish it will trigger the publishBlog function.
- inquirer : Inquirer.js is a JavaScript library used for creating interactive command-line interfaces (CLIs) in Node.js. It simplifies the process of prompting users for input and provides a wide range of customizable prompt types, including text input, checkboxes, lists, password inputs, etc. In my code I have used it to get token, blog's title etc.
async function publishBlog(){
let  questionToBeAsked = [
        {
          type:"input",
          name:'hashnodeToken',
          message:"Your Hashnode Personal Access Token",
        },
        {
          type:"input",
          name:'title',
          message:"Your blog title",
        },
        {
          type:"input",
          name:'publication',
          message:"Your publication name (name.hashnode.dev)",
        },
        {
          type:"input",
          name:'file',
          message:"Your filename",
        }
      ]

inquirer.prompt(questionToBeAsked).then(async(answer)=>{
    //in answer object I will get all the inputs
    console.log(answer.hashnodeToken);
})

}
//Based on the inputs I can perform other operation
graphql-request : To use graphql api of Hashnode
octokit/core : To call github apis
Graphql queries I have used
#to get the content of a specific user
query User($username: String!) {
        user(username: $username) {
          posts(pageSize:20,page:1) {
            nodes {
              id
              slug
              content {
                markdown
              }
            }
          }
          }
        }
# to get the user's publication id
query Publication(
            $id: ObjectId,
            $host: String
        ) {
            publication(
            id: $id,
            host: $host
            ) {
                id
            }
        }
Graphql mutations I have used
#to publish a blog
mutation PublishPost($input: PublishPostInput!) {
        publishPost(input: $input) {
          post {
            id
            slug
            title
          }
        }
Note : It is not possible to show all of the code . To view the code you can refer to this repository comhash
Conclusion
It was a great experience to participate in this hackathon. I have learned so many tools like Inquirer and Commander. The most important thing that I have learned is the basics of GraphQL through this journey. Thank you for reading.